
Create your own budget template for your adulting life
There are so many creators out there with amazing spreadsheets, justifying you getting them or buying them to help you achieve your financial goals. They have gorgeous graphs, that move with each value you add in your table, they got formulas and pretty colours, and it’s all very aesthetic. As a spreadsheet girly, I love messing around with excel and living my life with one. I am a chemist and very analytically minded, a spreadsheet is great for me. But what if you’re not like me and don’t have much experience with excel, or formulas or even computers (because that is still possible), but you want to create a budget template that works for you?
First things first: No need for the flash
Ok, yes you can go to so many different creators online with their idea of the perfect budget template, or you can buy one on Etsy and Ebay. But they are all very pretty ones within built systems that you might not have experience with.
Hypothetically, what would you do, if you accidentally messed with a formula or graph and then the spreadsheet doesn’t work like it originally did? Honestly, I don’t know, I have never read the T&Cs for people who send you their budget template, so no idea if they can fix it for you. But what if they don’t offer fix it,
Do you really need the spreadsheet with all the graphs and the colours? – I don’t, but if you do, feel free to go find those creators, but this post is about creating your own simple budget template on excel (and I’m sure you can apply these very basic ideas to Google Sheets if you prefer to use that).
What’s the point of the budget template?
Some people budget their money so they can achieve certain goals. Whether it’s financial freedom, making a purchase, building up savings or paying debt. You can use a budget for anything, because the key point of a budget is to be aware of where your money is going.
I have my budget so then I can see what money I have left over each month, in case I need to respond to an emergency, before relying on my credit card. The last 2 years I have been using that budget to help pay off a credit card debt (I didn’t succeed completely, I just transferred the balance to a 0% interest card, which I monitor on my budget).

Budgeting can seem overwhelming on a computer, but it can be done very simply
A budget is not to limit your spending, unlike how we use the term socially. “Oh, I can’t buy that, I’m on a budget”. “The budget is pretty tight this month, so I won’t come out tonight.” “I only budgeted £30 for this meal, so I can’t spend more than that today.” Even if you don’t say that out loud, you probably use similar terms to justify your actions. But having a budget means you are aware of your finances, which is really a good thing in adulting, because capitalism strives on us being debt and struggling financially, and it’s not a vibe in my opinion.
So, let’s create the budget template
Step 1: Open a blank spreadsheet
I use Excel.
Step 2: Each column (C-Z) will hold the money you spend each month.
Start in row 2* of column C, with the month we are in as of creating this, and thus write each month in a separate column until you have covered 12 months. I left out the A and B columns on purpose, see step 3.
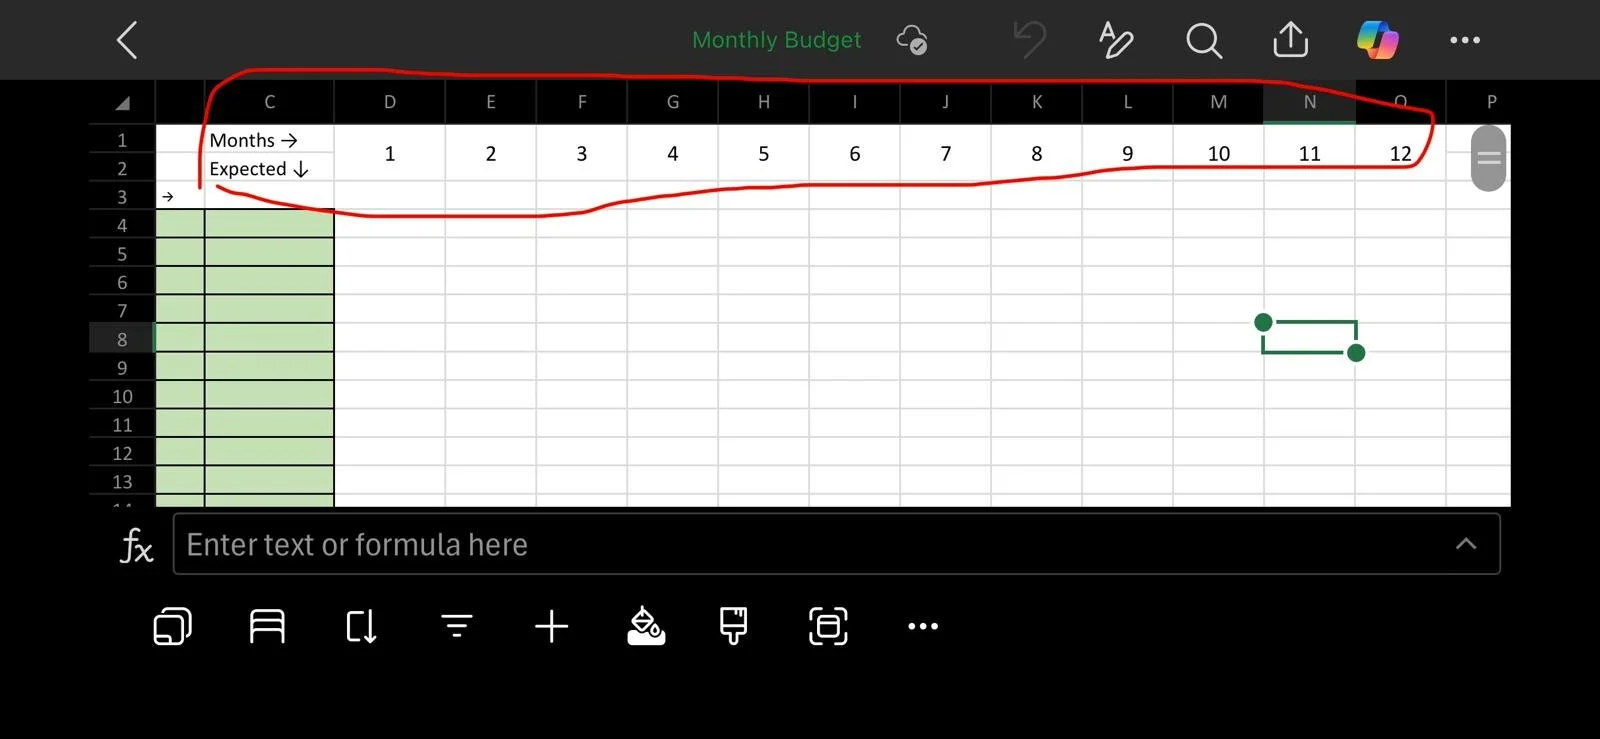
Screenshots from my phone, but still the same thing - This is my budget template that I link below if you don’t want to create your own
Step 3: Going down column A and B.
In column A (row 3*), this is where you put the labels of things you spend money on monthly. Such as rent/mortgage, bills, groceries, fuel, debt, savings, streaming services etc. Anything you pay regularly each month.
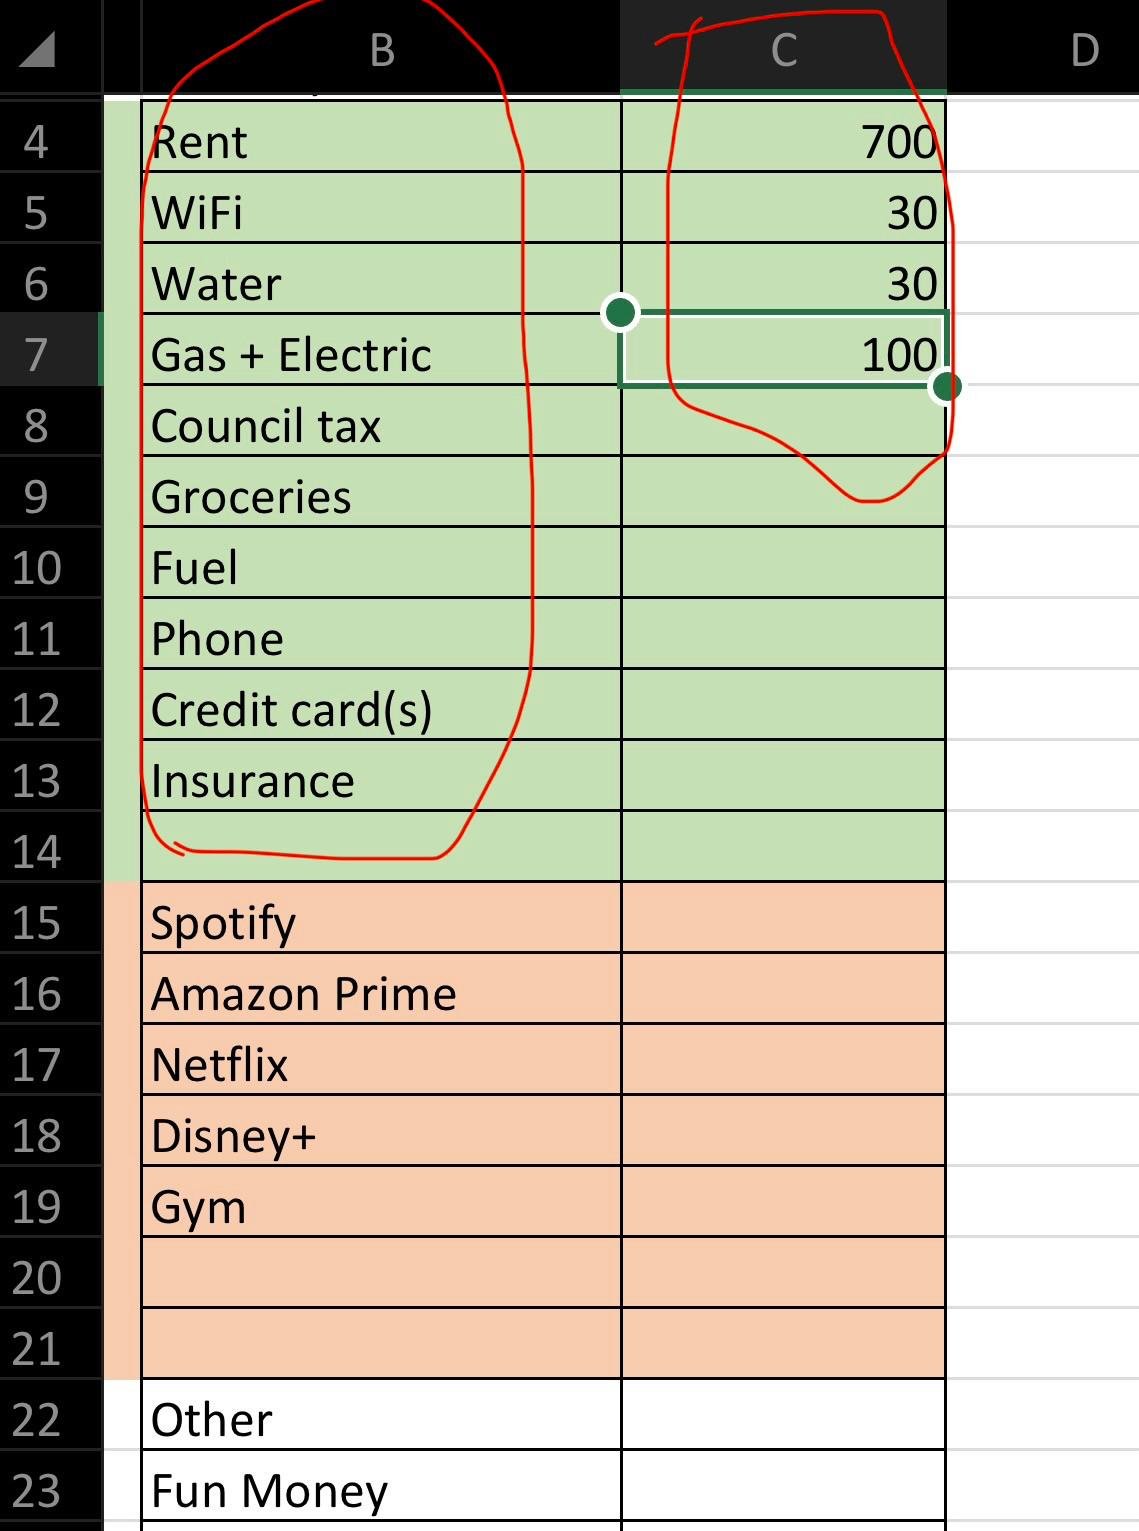
Utilising my phone screen for the circles
In column B (row 3*), you put the estimated amount you are meant to pay for item down column A. This helps for comparison of how you actually spend the money each month.
In my spreadsheet, I grouped all necessary outgoings together, then the optional outgoings together and the savings outgoings together. This allows me to keep an eye on where my money is going and to note that if I am having a tight month, I can pause the optional outgoings, rather than accidentally missing a necessary.
Necessary is things needed to survive, like rent, bills, food and debt payments (yeah you can’t avoid those without them ruining your life).
Optional is things like streaming services, anything amazon related, external self-care rituals (nails, hair, skin done at a place etc)
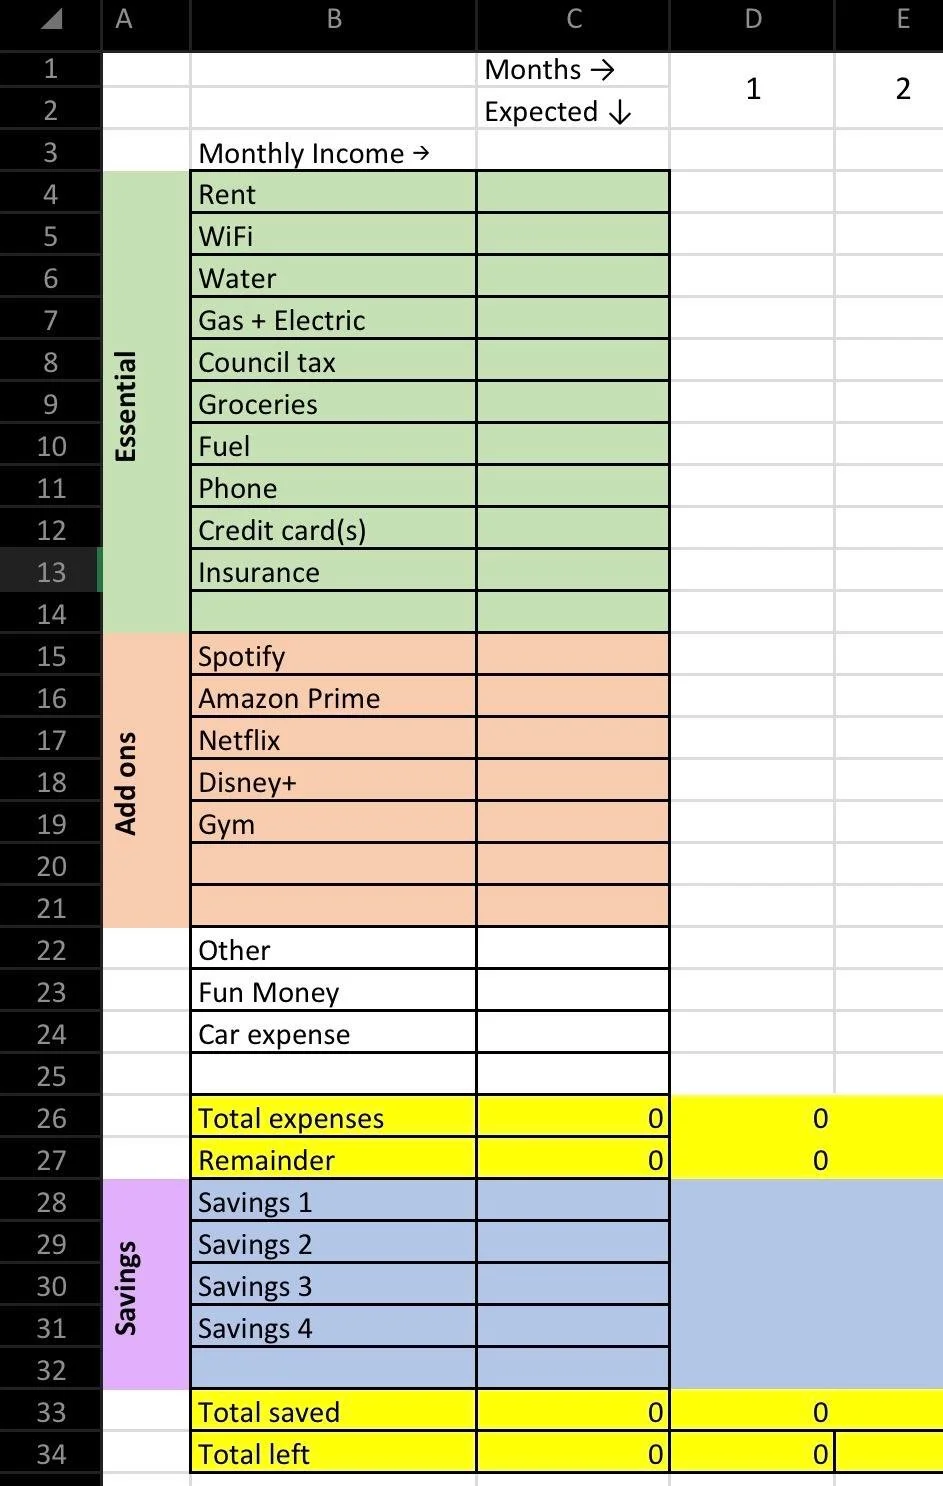
Note: Leave 2 rows blank between your outgoings, and your savings (see step 4 for that). Label the first blank as ‘Total expenses’ and the one beneath it as ‘Remainder’. (put the label in Column A)
Note 2: leave 2 rows blank after your savings. Label the blank as ‘Total saved’ and the one beneath as 'Total Left'. (put the label in Column A)
Step 4: Add the formulas.
I’m sorry, the formulas will make it necessary. But since I have written this here, you will have instructions forever on how to fix it, since these are very simple formulas. These formulas mean when you type in the actual amounts you spend each month, then your spreadsheet automatically does the maths for you, and leaves less room for error. Because the last thing we need is to think we have more money in our account than we actually have.
i) In the ‘Total Expenses’ row (in column B), start the equals sign “ = ”
This tells excel that you are about to put in a formula. Type in “ SUM( “
Then highlight all the rows in Column B and add the closed bracket “ ) ”

Making sure you see how the formula should look in excel
Click enter, and that’s the first formula, and the total amount of money you spent on those expenses will be shown in that box.
ii) In the ‘Remainder’ row (column B), start with the equals sign “ = ”
*This next step is why I suggested starting on row 2.*
You click the box in Column B row 1 (which is still blank at this time, but that’s ok)
Then add the subtract sign “ - ”
Then click the number in the ‘Total Expenses’ row in Column B

At this point I would say you are a pro at using excel now
Click enter, and it should give you a negative number. The aim is that in row 1 of each column, you put the total income you get that month. So, the remainder row (which is above your savings), shows you how much money after your expenses you have to put away in savings.
iii) Repeat step 4i) but ONLY with the savings rows, and this formula is typed in the ‘Total Saved’ row in column B.
iv) Repeat step 4ii), but the formula is ‘Remainder – Total Saved’, and it’s typed into the ‘Total Left’ row in Column B.
Column B is the ‘hypothetical column’. It shows you the ideal situation if you had 0 unexpected expenses or income. It’s not an aim, but it should be a reasonable comparison to each month. Because if you notice that you are consistently spending more on something compared to column B, then it’s something worth evaluating. The only thing is you need to keep an eye on column B, if your pay changes, or monthly payments increase, so keep that as up to date with reasonable estimates.
In my column B, I round up all my £X.99 payments to the full pound. It’s only 1p, but it’s handy so I know I can afford it hypothetically.
Long term use of the budget template
So you have filled out column B, and noted the months, but how do you use it long term, and also when the year ends?
Updating each month
You don’t have to type formulas every month for the total expenses and savings etc. When you click on the box with the formula in it, there is a little green circle in the bottom right-hand corner. Click that circle, specifically, and drag it across that 1 row, for all the months. This means each time you add the numbers in each month, excel will automatically apply the formula to that column. Saving you typing, but if you prefer to type, just follow the instructions above, but make sure to be in the column you want to be in. This works for all the formulas.
Updating each year
At the bottom of the screen there are tabs. You can copy the tab in excel, and it will reproduce everything, so you don’t have to recreate the template on a new tab. All you need make sure is to change the name. You do this by right clicking the tab name and choose ‘rename’. I make sure the name reflect the year I am working on. This is great way to keep them all together, but also I can compare how my finances have changed yearly.
What’s next?
Feel free to make it colourful, change the fonts and make it appealing to you!
You can also add your yearly expenses, but it’s only for transparency rather than to affect your actual budget. I tend to find most of my yearly expenses I am saving up for, so the money is accounted for in my savings accounts, rather than coming out of my monthly budget.
Also, I don’t use this to monitor what is in my savings, purely because, keeping on top of that is a lot for me. But feel free if you want to.
That’s it!
If you really want a budget template, but don’t want to create one, I have my budget template here, that you can download for free (in exchange for your email) and I have created using these exact instructions, so if you do mess up with the formulas, my instructions above still apply.
This is my budget template that I link above if you don’t want to create your own
TL;DR
- I gave you instructions to create your own simple budget template
But if you don’t want to create it, I have attached the one I have made, using these exact instructions, and it’s pre-decorated but I won’t be offended if you want to change the colours.